hosting notes, 2026-11-18.
This 2020 walkthrough uses OpenVPN on Debian. Google lists an e2-micro VM in us-west1, us-central1 or us-east1 under its monthly Compute Engine allowance. Check disk, outbound traffic and external IP pricing for your configuration. The screenshots and install steps are from the original setup. The pricing terms were reviewed separately from the original installation. Google Cloud Free Tier
Not responsible for any misuse, and/or otherwise unintended billing or other consequences as a result of following this guide.

This guide connects phones, tablets, and computers to a self-hosted OpenVPN server. Pi-hole filters DNS queries sent through that connection.
Run your own privacy-first ad blocking service within the Free Usage Tier on Google Cloud. This guide gets you set up with a Google Cloud account, and walks you through setting up a full tunnel (all traffic) or split tunnel (DNS traffic only) VPN connection on your Android & iOS devices, and computers.
Both Full Tunnel and Split Tunnel VPN connections provide DNS based ad-blocking over an encrypted connection to the cloud. The differences are:
A Split Tunnel VPN allows you to interact with devices on your Local Network (such as a Chromecast or Roku).
A Full Tunnel VPN can help bypass misconfigured proxies on corporate WiFi networks, and protects you from Man-In-The-Middle SSL proxies.

1. Google Cloud Login and Account Creation#

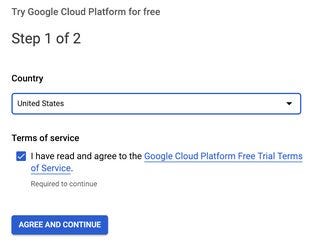
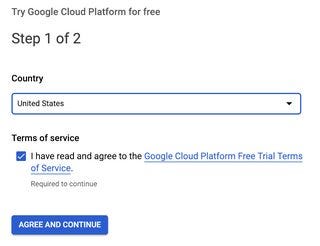
Step 1 of 2 Agree to the terms and continue.
Step 2 of 2 Set up a payments profile and continue
2. Project & Compute Engine Creation#

- Click Compute Engine:

- Select VM instances:

Name your Virtual Machine pi-hole. For the e2-micro allowance, choose us-west1, us-central1, or us-east1. I have used us-east1 and the us-east1-b zone because it is closest to me.
Choose e2-micro for the current Free Tier machine type.
Change the Boot Disk to be 30GB if you plan on keeping your DNS lookup records for any reason, otherwise the default 10GB disk allocation is adequate.
Allow HTTP traffic in the Firewall (add a checkmark).
Allow HTTPS traffic in the Firewall (add a checkmark).

- Expand Management, Security, disks, networking, sole tenancy and click the Network tab. Click the Pencil icon under Network Interfaces.

- The External IP Address should not be Ephemeral. Choose Create IP Address to Reserve a New Static IP Address

- Click the Hamburger Menu at the top left, click VPC Network and click Firewall Rules.


Click Create Firewall Rule at the top center of the page. The name of your rule should be
allow-openvpn, change the Targets dropdown to All instances in the network. The Source IP Ranges should be0.0.0.0/0. The udp checkbox should be selected, and the port number next to it should be changed fromallto1194.Then click the Create button. You can disable the
default-allow-rdprule which Google set up with a default action of Allow, but because our server does not run any service on Port 3389 it is harmless to leave this rule alone. Do not disable the default-allow-ssh firewall rule, or you will disable the browser-based SSH from within the Google Cloud Console.
3. Debian Update & Upgrade#

Once you log into your Virtual Machine via SSH, you want to update and upgrade it.
Ensure you have elevated root privileges by running this command in the bash shell:
sudo suAnd then run:
apt-get update && apt-get upgrade -y4. Pi-Hole Installation#

- Install Pi-Hole by running this command in the bash shell:
curl -sSL https://install.pi-hole.net | bashYou will flow into a series of prompts in a blue screen.
Set a strong password that you will remember for the Web Interface
Log into the web interface using the External IP that you noted down earlier at
[http://your-external-ip/admin/settings.php?tab=dns](http://your-external-ip/admin/settings.php?tab=dns)Click Settings, and navigate to DNS. Set your Interface Listening Behavior to Listen on All Interfaces on this page:

- Click the Save Button at the bottom of the page.
5. PiVPN#

Ensure you have elevated root privileges by running this command in the bash shell:
Install PiVPN by running this command in the bash shell:
curl -L https://install.pivpn.io | bashYou will flow into a series of prompts in a blue screen. All of the default values are appropriate.

The default answer to reboot is No at the end of the installer. It is fine to say No, we have a few more things to edit while we’re logged in as root.
6. OpenVPN Configuration#

Ensure you have elevated root privileges by running this command in the bash shell:
sudo suGet into the openvpn directory by running this command in the bash shell:
cd /etc/openvpn7. Server Configuration for VPN over UDP on Port 1194#
Edit server.conf. I use nano to edit by running this command in the bash shell:
nano server.confComment out the line which reads push "redirect-gateway def1" so it reads as follows:
push “redirect-gateway def1”#
The longer the keep-alive interval the longer it will take either end of the openvpn connection to detect whether the connection is no longer alive. Because mobile devices often lose connectivity and regain it, lower values are desirable.
Comment out keepalive 1800 3600 and add keepalive 10 60 below it, so it appears as follows:
keepalive 1800 3600 keepalive 10 60#
Comment out the line which reads cipher AES-256-CBC and add cipher AES-128-GCM below it, so it reads as follows:
cipher AES-256-CBC cipher AES-128-GCM#
At the bottom of the file add the following lines:
performance stuff fast-io compress lz4-v2 push “compress lz4-v2”#
Press CTRL O to bring up the save prompt at the bottom of Nano, press Enter to save. Then press CTRL X to exit
8. Server Configuration for VPN over TCP on Port 443#
Ensure you have elevated root privileges by running this command in the bash shell:
sudo suGet into the openvpn directory by running this command in the bash shell:
cd /etc/openvpnTo accept incoming OpenVPN connections over TCP on port 443 we need a separate configuration file. We can clone our existing configuration as a starting point, by running this command in the bash shell:
cp server.conf server_tcp443.confEdit /etc/iptables/rules.v4. I use nano to edit by running this command in the bash shell:
nano /etc/iptables/rules.v4Below the line which reads -A POSTROUTING -s 10.8.0.0/24 -o eth0 -j MASQUERADE, add the following on a new line:
-A POSTROUTING -s 10.9.0.0/24 -o eth0 -j MASQUERADE
Press CTRL O to bring up the save prompt at the bottom of Nano, press Enter to save. Then press CTRL X to exit
Edit server_tcp443.conf. I use nano to edit by running this command in the bash shell:
nano server_tcp443.confReplace the
proto udpandport 1194lines with:Edit the
server 10.8.0.0 255.255.255.0line to reflect an IP address of 10.9.0.0, so it reads as follows:
server 10.9.0.0 255.255.255.0
- Edit the
push "dhcp-option DNS 10.8.0.1"line to reflect an IP address of 10.9.0.1, so it reads as follows:
push “dhcp-option DNS 10.9.0.1”
Comment out keepalive 10 60 and add keepalive 10 120 below it, so it appears as follows:
keepalive 10 60 keepalive 10 120#
Comment out fast-io so it looks like this:
Press CTRL O to bring up the save prompt at the bottom of Nano, press Enter to save. Then press CTRL X to exit
Add the OpenVPN service on Port 443 by running this command in your bash shell:
systemctl enable openvpn@server_tcp443.service9. Finalize VPN Confgurations on Server#
Reboot the server by running this command in your bash shell:
shutdown -r now 10. Managing the PiVPN#

Connect to the Pi-Hole server and set up an OpenVPN Client Profile. (You do not need to have elevated root privileges to do this.)
pivpn add nopassGive your client profile a name. I like to use an alphanumeric string composed of the user’s first name, and their device’s make and model (no spaces and no special characters).
11. NOTE#
Make a new client profile for every device. DO NOT share a client profile between two different devices.
This command will output a success message which looks like this:
======================================================== Done! mypixel3xl.ovpn successfully created! mypixel3xl.ovpn was copied to: /home/myusername/ovpns for easy transfer. Please use this profile only on one device and create additional profiles for other devices. ========================================================
To get the mypixel3xl.ovpn file to your phone it is easiest to maximize your SSH window and print the file to the terminal window, to copy & paste the output:
cat ~/ovpns/mypixel3xl.ovpnPress CTRL - until the screen zooms out to a point where you can see the entire ovpn file printed on the screen. The first line will have the word client and the last line is </tls-crypt>. Highlighting this entire chunk with a mouse will cause a scissor icon to appear in the middle of your SSH window, this means this selection has been copied to your clipboard.
12. Saving a Split Tunnel VPN Client Profile for UDP VPN Connections on Port 1194#
Paste this into your favorite Text Editor and save the file with a name that is clear: mypixel3xl-udp-1194-split-tunnel.ovpn
Around Line 12, edit the line which reads cipher AES-256-CBC and change it to read:
cipher AES-128-GCM13. Saving a Full Tunnel VPN Client Profile for UDP VPN Connections on Port 1194#
Copy the contents of mypixel3xl-udp-1194-split-tunnel.ovpn and paste it into your favorite Text Editor, save the file with a name that is clear: mypixel3xl-udp-1194-full-tunnel.ovpn
Below cipher AES-128-GCM add this line:
redirect-gateway def114. Saving a Split Tunnel VPN Client Profile for TCP VPN Connections on Port 443#
Copy the contents of mypixel3xl-udp-1194-split-tunnel.ovpn and paste it into your favorite Text Editor, save the file with a name that is clear: mypixel3xl-tcp-443-split-tunnel.ovpn
Change proto udp on Line 3 to proto tcp
proto tcpChange the 1194 at the end of Line 4 to 443, do not change the IP address on this line (it is your Google Compute Engine Virtual Machine’s external IP address):
remote YOUR-EXTERNAL-IP-IS-HERE-LEAVE-THIS-AS-IT-IS 44315. Saving a Full Tunnel VPN Client Profile for TCP VPN Connections on Port 443#
Copy the contents of mypixel3xl-tcp-443-split-tunnel.ovpn and paste it into your favorite Text Editor, save the file with a name that is clear: mypixel3xl-tcp-443-full-tunnel.ovpn
Below cipher AES-128-GCM add this line:
redirect-gateway def116. Make these .ovpn files available on your phone or tablet#
E-mail these files to yourself, upload in Google Drive, or use whatever secure method you prefer to transfer this file to your device. It is safe to download this file to your device.
17. WARNING#
Anyone that gets one of these .ovpn files can connect to your server.
18. Full & Split Tunnel VPN on Android & iOS Devices#
This is open source software.
Get it on FDroid: https://f-droid.org/repository/browse/?fdid=de.blinkt.openvpn
Get it on Google Play: https://play.google.com/store/apps/details?id=de.blinkt.openvpn
Install the “OpenVPN for Android” application on your Android device.
When the “OpenVPN for Android” opens you are in the Profiles Tab. You will have to perform the following steps for mypixel3xl-udp-1194-split-tunnel.ovpn, and again for mypixel3xl-tcp-443-split-tunnel.ovpn
- Import your Profile, click the
+at the top right.

Then click Import at the bottom left of the modal that appears.
Click the Hamburger Menu at the top left to choose Google Drive, or your Downloads folder, depending on what method you used to get the .ovpn file to your phone.
Click the pencil icon next to the VPN profile you imported.

Click the Server List Tab.
Click the IP AND DNS Tab.
No local binding should be enabled
Override DNS Settings by Server should be enabled
searchDomain should be empty
DNS Server should be 10.8.0.1
Backup DNS Server should be empty
Click the Routing Tab.
Under the Authentication/Encryption Tab
Under the Allowed Apps Tab
The first Toggle should be disabled, and will read VPN is used for only for selected apps.
the Android System WebView, your preferred web browser, and any other apps you wish to block ads in, should have a checkmark.
Click the back button a couple times until you are at the Profiles Tab again.
Click the Settings Tab:
OpenVPN 3 Core should have a checkmark
click Default VPN and choose the VPN you have imported
Connect on Boot should have a checkmark
Pause VPN connection after screen off should be enabled if you wish to save your battery and reduce data usage, and only want to block things while you’re actively using your phone.
Click the back button a couple times until you are at the Profiles Tab again.
19. “OpenVPN Connect” on Android for Full Tunnel VPN#
This is open source software.
Get it on Google Play: https://play.google.com/store/apps/details?id=net.openvpn.openvpn
Install the “OpenVPN Connect” application on your Android device.
Download the mypixel3xl-udp-1194-full-tunnel.ovpn and mypixel3xl-tcp-443-full-tunnel.ovpn files from your E-mail or your Google Drive to your Android Phone or Tablet. These files will be saved to your device’s “Download” folder by default.
When the “OpenVPN Connect” application opens up, in its home screen you will see 3 options, Private Tunnel, Access Server, and OVPN Profile. Click on OVPN Profile.
Import and Add an .ovpn client profile by tapping your .ovpn filename, and then tapping Import on the top right, and then tapping Add. If you have already imported a client profile already, you can import more client profiles by pressing the + button at the bottom right.
Click the Hamburger Menu at the top left and click Settings
Under IPv6, the IPv4 Only Tunnel button should be selected. (The default selection is No Preference)
Under Connection Timeout, the Continuously Retry option should be selected. (The default selection is 1 Min)
Under Compression, the Downlink Only button should be selected. (The default selection is Full)
Under DNS Fallback the checkbox should be deselected/empty. (By default the checkbox is ticked)
Click Save at the top right.
20. “OpenVPN Connect” on iOS for Full & Split Tunnel VPN#
This is open source software.
Get it on the App Store: https://itunes.apple.com/us/app/openvpn-connect/id590379981?mt=8
Install the “OpenVPN Connect” application on your iOS device.
Import and Add all of your .ovpn files using one of the following two methods:
- Using iTunes Sync, select your device, go to OpenVPN under the apps tab, and drop your .ovpn files into the file sharing window.
- Using Google Drive or your e-mail you can open the .ovpn files with OpenVPN.
Click the Hamburger Menu at the top left and click Settings
Under Connection Timeout, the Continuously Retry option should be selected. (The default selection is 30 Sec)
Under Compression, the Downlink Only button should be selected. (The default selection is No)
Under DNS Fallback the checkbox should be deselected/empty. (By default the checkbox is ticked)
21. Full & Split Tunnel VPN on Computers#
22. NOTE#
Due to the amount of bandwidth a computer could use, it is recommended to use the Split Tunnel .ovpn profiles on computers, and not Full Tunnel.
23. “Viscosity VPN” on macOS or Windows#

This is commercial software.
Import the Split Tunnel .ovpn files once Viscosity VPN is installed and running.
To enable Split Tunnel VPN with Viscosity on Windows, once you import the connection to Viscosity, Edit Connection and click the Networking Tab. Under the DNS Mode dropdown, choose Full DNS (Use VPN DNS for all traffic).
24. “OpenVPN GUI” on Windows#
This is open source software.
Import the Split Tunnel .ovpn files once the OpenVPN GUI is installed and running.
25. “Tunnelblick” on macOS#

This is open source software.
You can install Tunnelblick with Homebrew:
brew cask install tunnelblickIf you don’t have Homebrew, you can get alternate installation instructions on the Tunnelblick website.
Import the Split Tunnel .ovpn files once Tunnelblick is installed and running.
26. “gnome-manager” on Ubuntu (and its variants)#

This open source software is baked into Ubuntu’s OS
Enable the option which reads Use this connection only for resources on its network in the IPv4 Tab
Go to http:///Advanced_OpenVPNClient_Content.asp
Select an unused client instance (usually Client 1).
Beside Import .ovpn File, click Browse
Browse to your OpenVPN Client Profile (e.g. asuswrt-udp-1194-split-tunnel.ovpn)
Click Upload
Set Accept DNS Configuration to STRICT
Click the Service State toggle to activate the client
Scroll to the bottom and click Apply
Under WAN DNS Setting, set Connect to DNS Server automatically to NO.
Set DNS Server1 to 10.8.0.1
Scroll to the bottom and click Apply

27. Use AsusWRT Firewall to force all DNS traffic to Pi-Hole#
Go to http:///Advanced_Firewall_Content.asp
Set Enable Network Services Filter to YES
Add the following rules to the Network Services Filter Table
Port Range = 53, Protocol = UDP
Port Range = 53, Protocol = TCP
Destination IP = 10.8.0.1, Port Range = 53, Protocol = UDP
Destination IP = 10.8.0.1, Port Range = 53, Protocol = TCP
Scroll to the bottom and click Apply

28. Verify Everything Works#
28.1. Test your Full Tunnel VPN#
You do not need to perform this test if you are using a Split Tunnel to access only the DNS over VPN.
Go here: https://www.google.com/search?q=what+is+my+ip
You will see your IP address displayed very prominently at the top above the label: Your public IP address
If you see anything other than the External IP Address of your Google Compute Engine Virtual Machine, then you do not have a Full Tunnel VPN.
If you see an IPv6 address while connected to the VPN, then you have a big problem.
Example of an IPv6 address:

You can do some further troubleshooting by visiting: https://www.whatismyip.com
If you see no IPv4 address, and a public IPv6 address identical to the one from the Google search result earlier, it means your tunnel is not processing any IPv4 traffic, and you are going out to the Internet over IPv6 directly.
This typically means you have a problem with your server configuration and client configuration files.
29. Test for a DNS Leak#
If DNS lookups are not happening exclusively over the VPN connection to the Pi-Hole server, then you have a DNS leak. A DNS leak will result in ads appearing.
In the Pi-Hole Web Interface at http://your-external-ip/admin/settings.php?tab=dns choose just one DNS provider. The two Google IPv4 DNS servers will give you the highest performance. For our test, we will deselect the Google IPv4 DNS servers and choose the 2 Cloudflare DNS servers.

On your device, go to https://www.dnsleaktest.com/ and click the Extended test button. On the table in the next page, every single row must say “Cloudflare”. If you see any IPs that do not belong to Cloudflare, you have a DNS leak. This typically means you have a problem with your server configuration and client configuration files.
Turn your VPN off and try the Extended test again, you will see your default DNS servers as defined by your Internet provider or your Router.
Once you are done testing, only use the Google IPv4 Upstream DNS Servers if you want the fastest DNS resolvers for your Pi-Hole. You can use any of the other Upstream DNS servers if speed is not your number one requirement.
A quick test page to verify if your ad blocking is working: https://blockads.fivefilters.org/?pihole
The Pi-Hole project also maintains a list of excellent advertising-littered pages that you can test: https://pi-hole.net/pages-to-test-ad-blocking-performance/
You may not be comfortable leaving the Pi-Hole web interface accessible on a Public IP
31. Firewall#
If you do not wish for the Pi-Hole web interface to be accessible publicly, disable Port 80 in your Google Cloud Firewall.
- Log into Google Cloud Console: https://console.cloud.google.com/
- Ensure your Project is selected in the blue bar at the top (next to the words “Google Cloud Console); by default it should be
- Click the Hamburger Menu at the top left, click VPC Network and click Firewall Rules
- Click default-allow-http in the table
- Click Edit at the top of the page
- Click Disable Rule above the “Save” button to reveal a radio button group
- Select Disabled
- Click the Save button
default-allow-rdp is not necessary, because your Pi-Hole is not running on a Windows server and there is no service running on Port 3389
To access your Pi-Hole web interface once you do this, you will have to connect via VPN, and then go to http://10.8.0.1 if you are using a UDP profile (desirable), or http://10.9.0.1 if you are using the TCP profile (less desirable).
31.1. Firewall rules that are inconvenient to disable:#
default-allow-ssh should really only be open to Google’s private network, alas they leave it open to the whole world by default. Nobody can successfully brute force their way into your server on Port 22, because it’s not secured with passwords. It is secured with keys. If you disable this rule, you will not be able to use the browser based SSH interface in the Google Cloud Console until you re-enable this rule.
32. Configure automated Pi-Hole updates and scheduled reboots#
PiVpn enables automated security updates of your Pi-Hole, but it won’t restart the VM if the update requires it. Restarting the VM would require SSH’ing into it and restarting it if required. To remove that step, let’s use a daily cron job to check to see if a restart is required and restart the VM as necessary.
To do that, let’s add a new file to /etc/cron.daily/ called zz-restart-if-required using the following command sudo nano /etc/cron.daily/zz-restart-if-required. In nano, add the following lines of code which check to see if the reboot-required token file is present, restarting the VM if so:
#!/bin/sh
if [ -f /var/run/reboot-required ]; then
  /sbin/shutdown -r now
fi
Files stored in /etc/cron.daily/ will only run if the permissions are configured to allow that, so we need to change the permissions to allow that file to run. To do that, execute sudo chmod 755 /etc/cron.daily/zz-restart-if-required.
Similarly, Pi-Hole gets updated from time to time. Let’s automate installing those updates as well. To do that, let’s create a file using sudo nano /etc/cron.daily/update-pi-hole and add in the following chunk of code:
#!/bin/sh
/usr/local/bin/pihole -up
We need to change its permissions so it is executable sudo chmod 755 /etc/cron.daily/update-pi-hole.
If you’re curious when they will run, Stack Exchange has a great Q&A for you.
33. Cloud Console Mobile App#
Install the “Cloud Console” app on your Android or iOS device.
Manage and monitor Google Cloud Platform services from your Android or iOS device.
If you spot an issue in this guide, please open a pull request with the fix.